The user input & custom field add-on and SocialMate’s messenger bot together can collect different types of information and instantly use this information to communicate with the users well– it can communicate like a human being. Unlike web-view, instead of taking the user to a web-view and telling them to fill out a field, it collects information inside the very messenger while chatting with the users. Moreover, the add-on collects information without telling the users to click on Quick reply buttons for the users’ phone number, email address or birth date. Therefore, people feel free to provide their information.
Besides users’ phone numbers and email addresses, birth date, it can collect any kind of information in text, number, and Datetime format. Also, it can collect links, files, images, and videos. In one word, the SocialMate’s User Input Flow and Custom Fields can collect any kind of information. And the information will be saved to the messenger subscriber, a feature of XeroChat for storing information collected via Facebook messenger. Also, it directly assigns users’ Email addresses and phone numbers to SocialMate’s Messenger, Email, and SMS sequence campaign.
How to set the User Input Flow and Custom Fields:
First, you have to make a campaign on the interface of User Input Flow and Custom Field. Then you have to make bot reply settings, selecting the User Input Flow as Reply type and selecting the campaign you have created on the interface of the add-on. Then the add-on will be able to collect different kinds of information from the users.
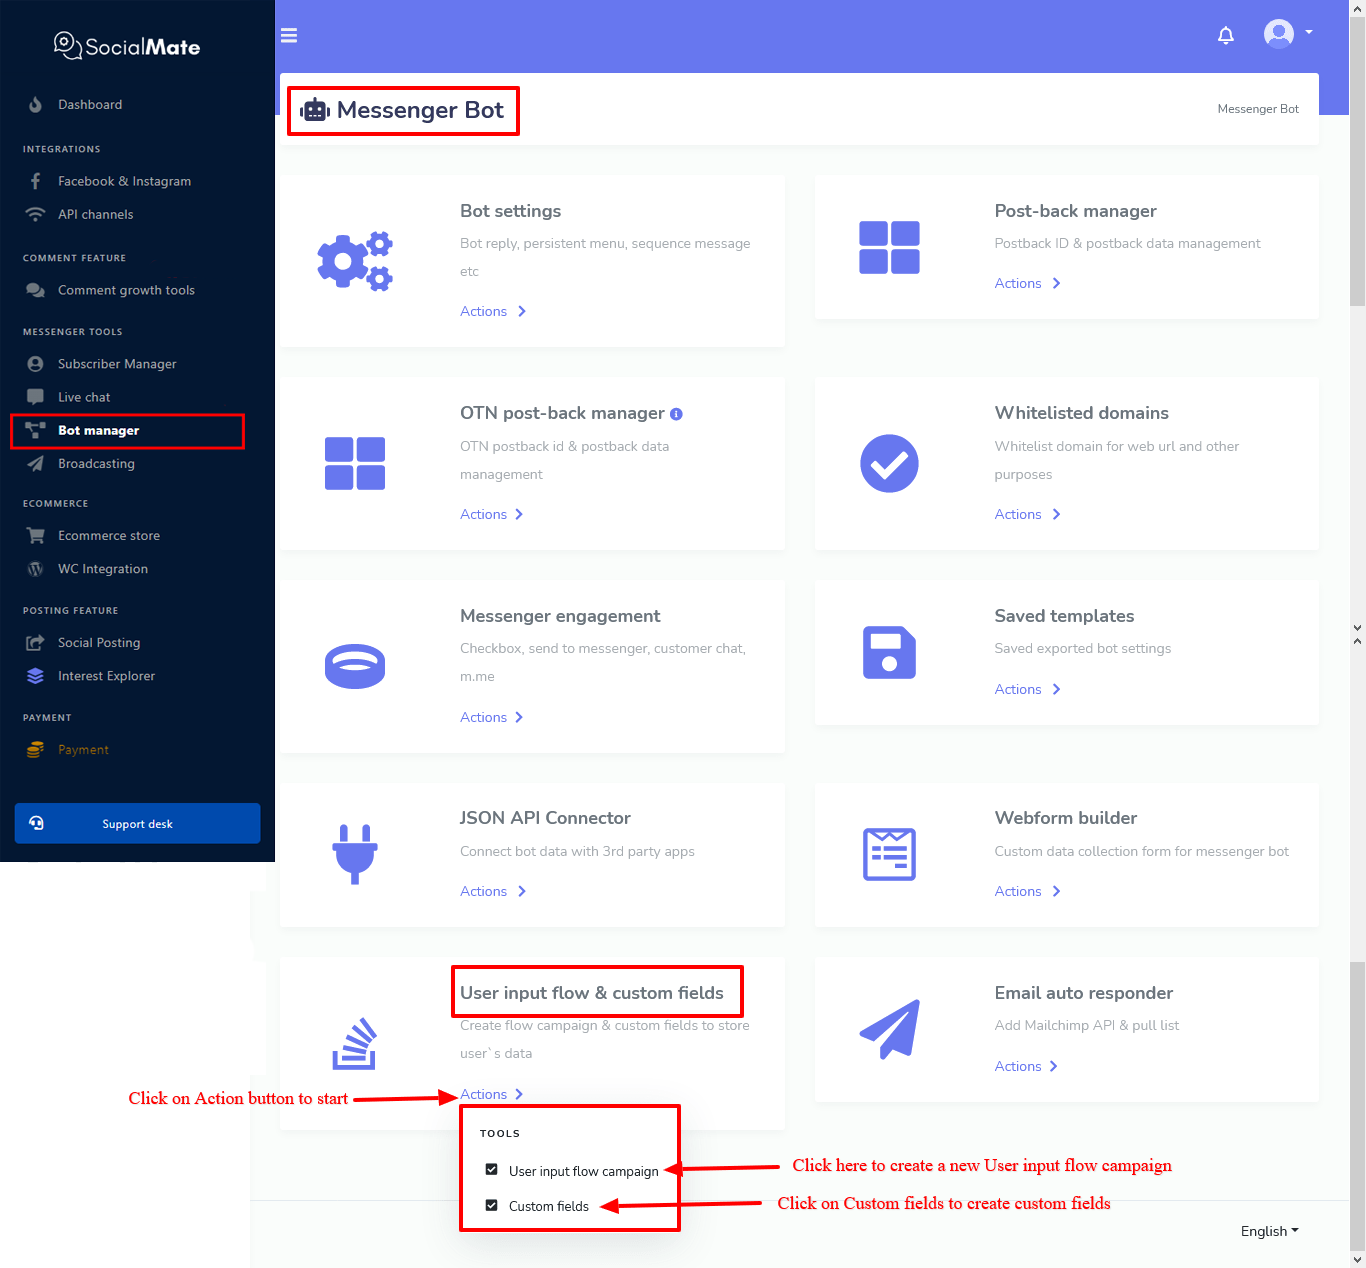
To make a campaign for User Input Flow and Custom Fields, go to Messenger Bot> User Input Flow and Custom field> Action Button.
When you click on the Action button, under the action button, you will see two sub-menus–Create User Input Flow Campaign and Create Custom Field.
Create a Custom Field
If you need a field other than the system-defined fields, you have to create custom fields. Okay let’s see how to create a custom field.
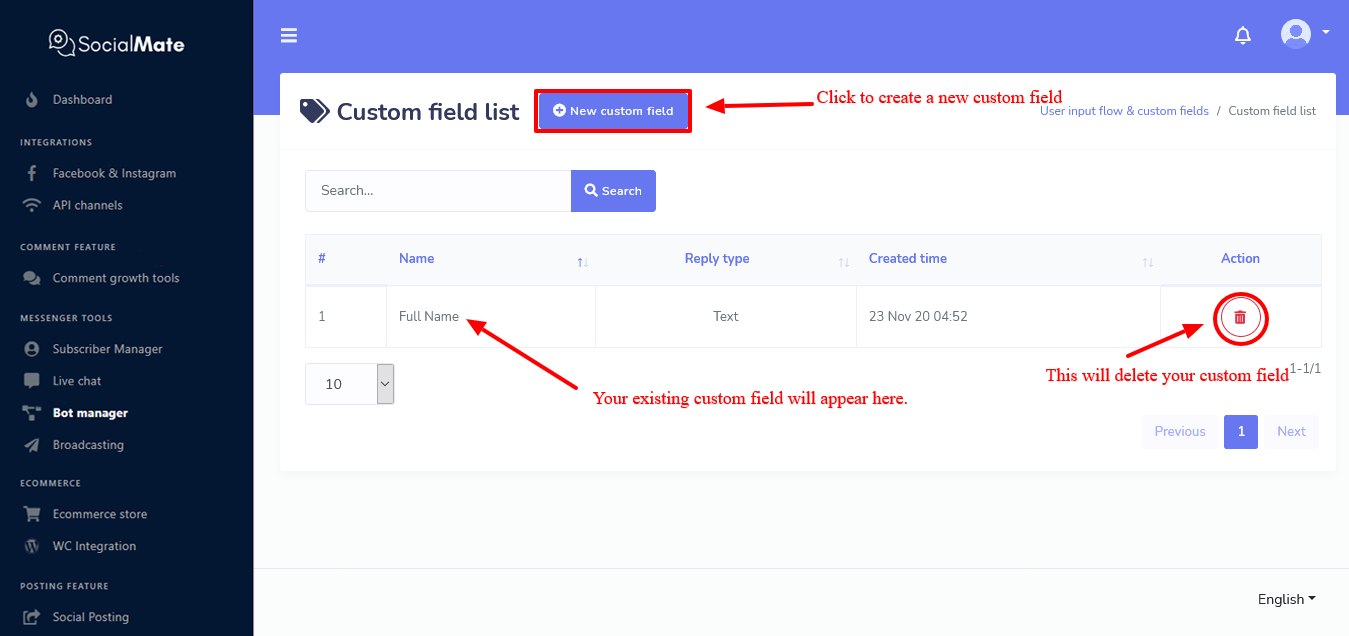
First, go to Action> Custom Field > Click on the New Custom Field > Fill out a form> Click on the Save button.
When you click on the New Custom Field button, a form will pop up. And you have to fill out the form, providing a name for the Custom Field and selecting a Reply type from the drop-down list. Click on the Save button.

Instantly, the Custom Fields will appear on the page with a delete button beside it. You can add as many custom fields as you want. Of course, you can delete your existing Custom Fields by clicking on the Delete button.
Create User Input Flow
After you have created your Custom Field, you can create a campaign for User Input Flow, using the custom field you have created.
To create a campaign, go to Messenger Bot> User Input Flow and Custom field> Action > User Input Flow Campaign> Click on the New flow> Fill out the form.
Just as you click on the New Flow button, a form will appear, and you have to fill out the form.
How To Fill Out The Form
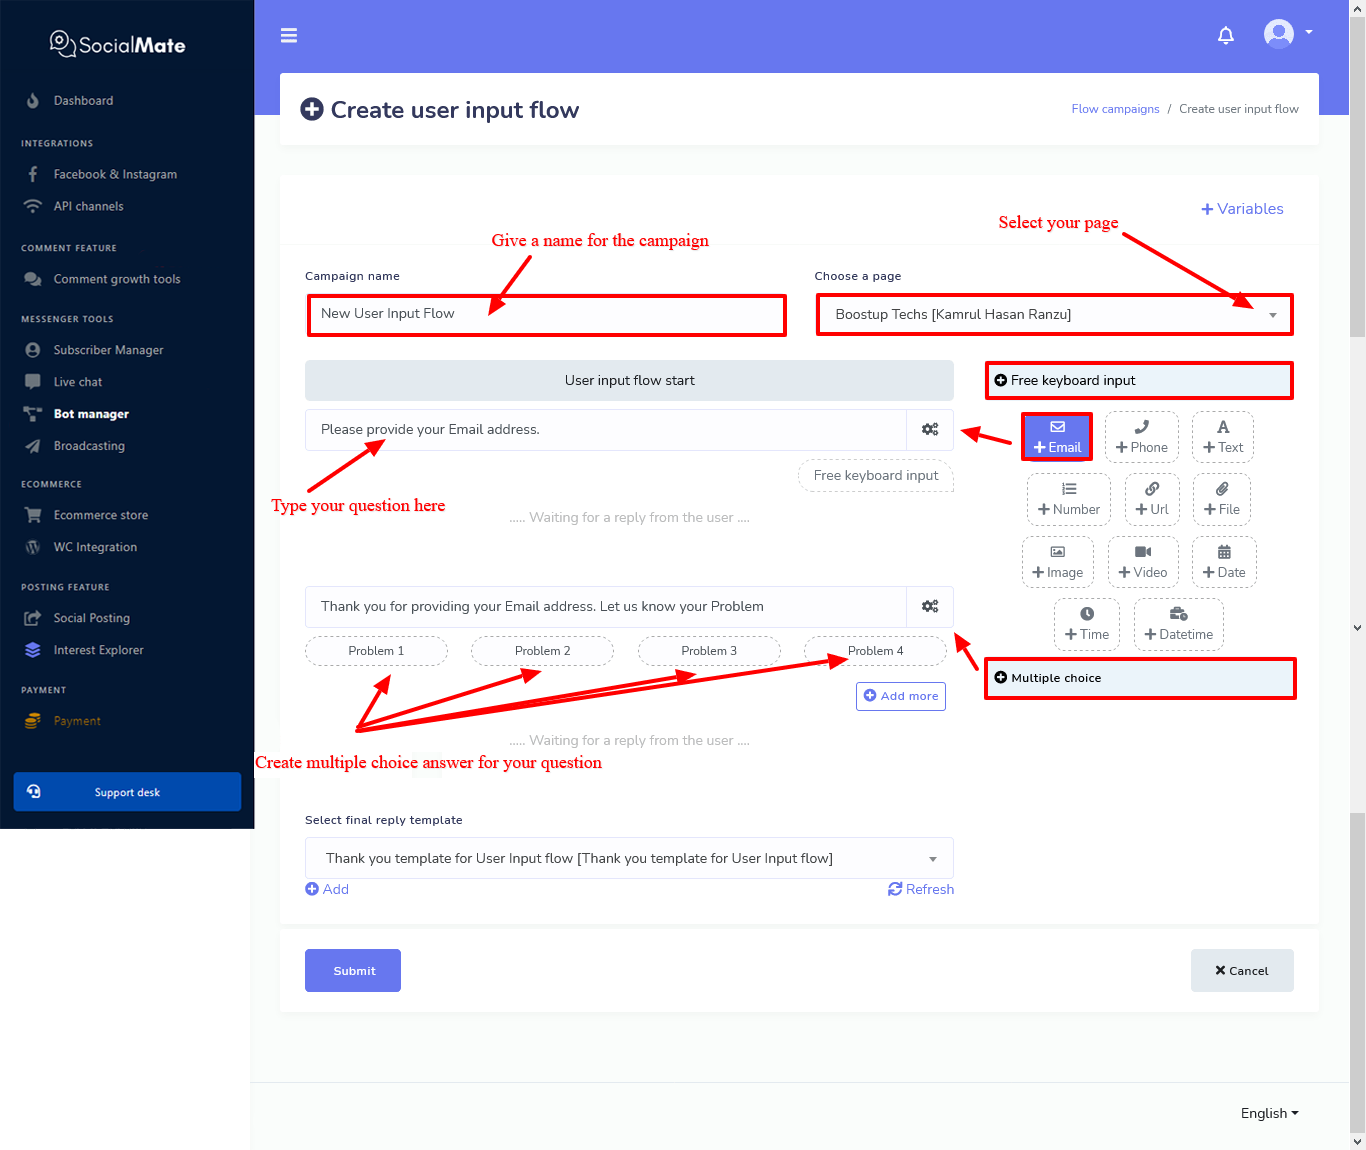
First, give a name for your campaign in the campaign name box and select your Facebook page. On the right side, you can see two types of Question builder– Free Keyboard input and Multiple choice. If you want to make multiple choice questions, select the Multiple Choice option. But if you want to make a general question, select and format from the table under the Free Keyboard input option.
Okay, let’s create a campaign.
First, select a format from the table under the free keyboard option. Instantly, a field will appear with a settings button at the right side.
As for the multiple choice question, click on the multiple choice options. And in addition to a question field, four options will appear so that you can include your choices for the questions.
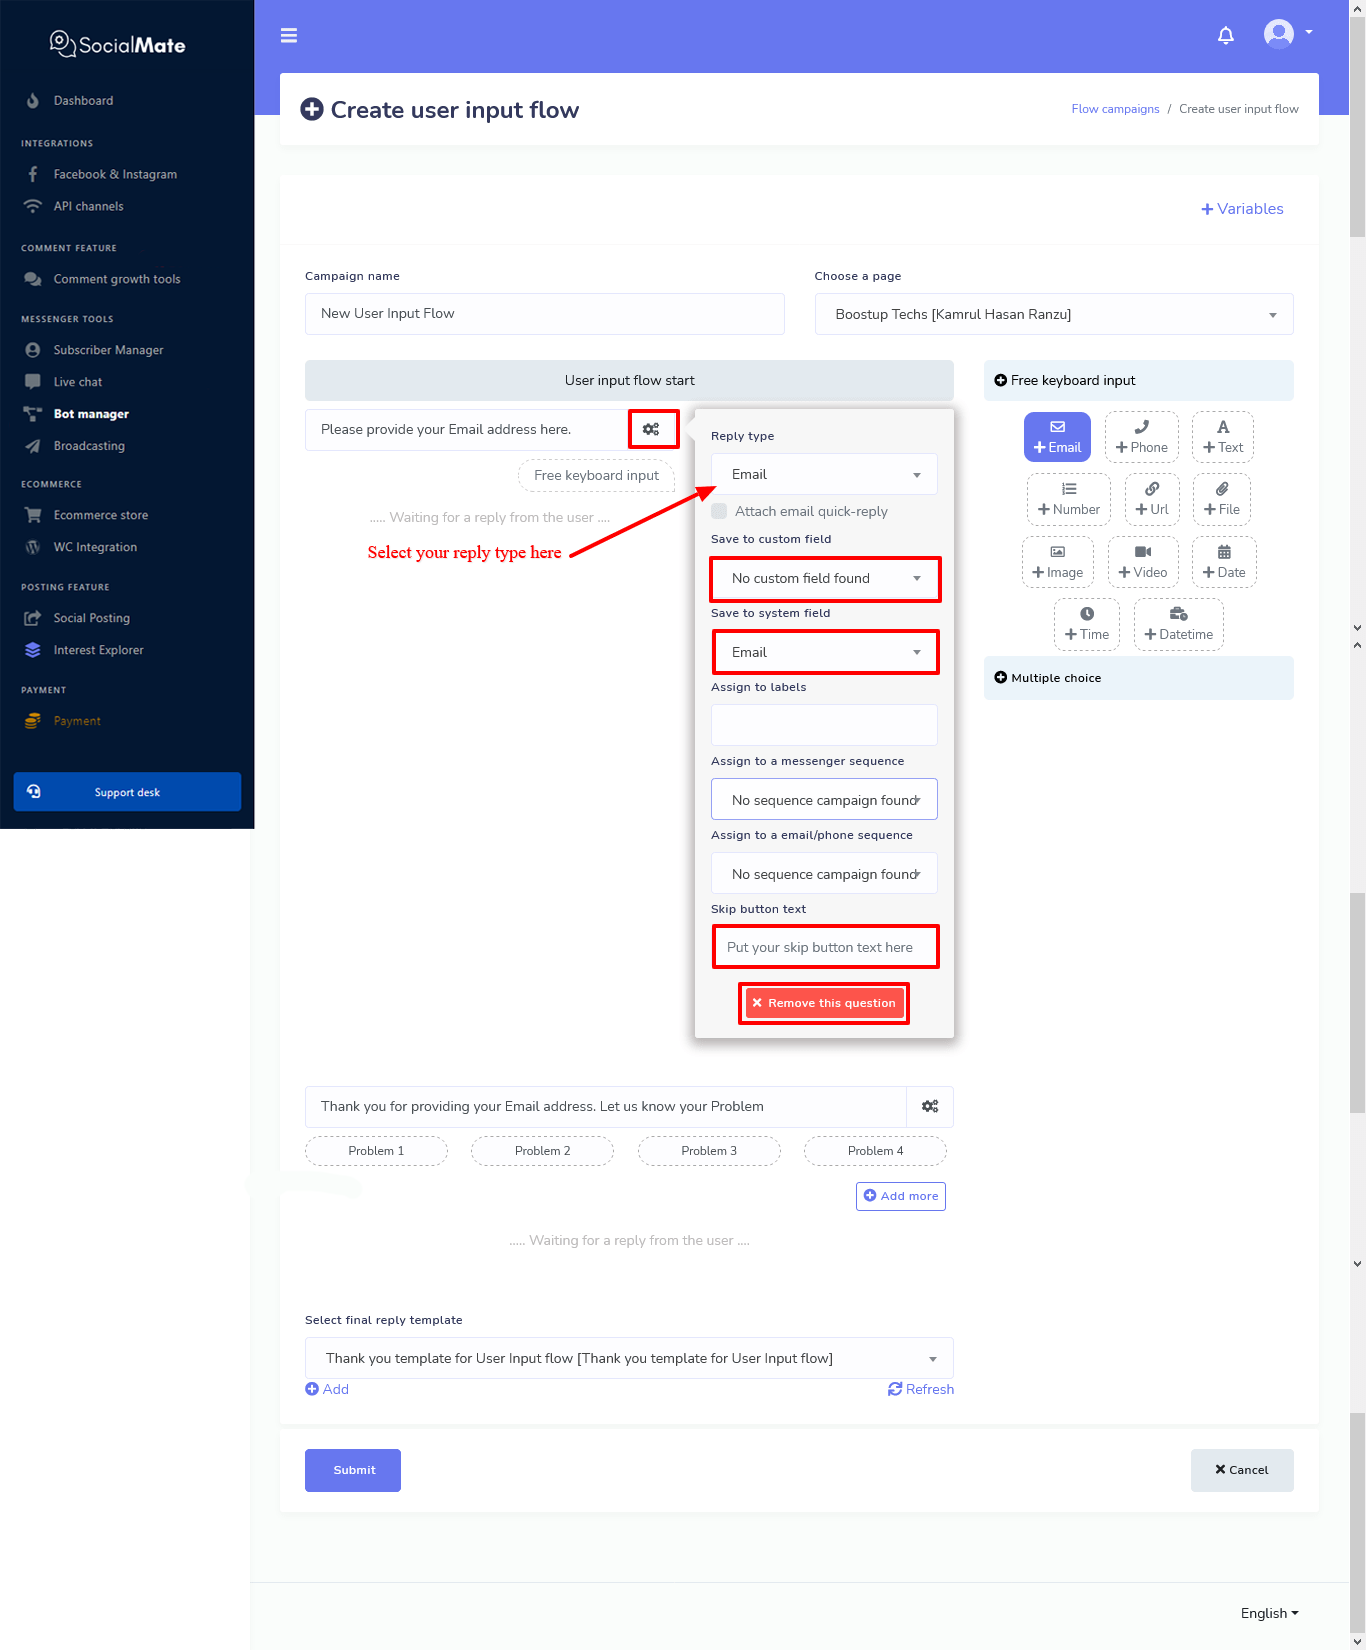
You can add more choice by clicking on the Add more button. Now put your question and for the multiple choice options insert the choices and click on the settings button. Just as you click on the settings button, a drop-down form will appear. Now you have to fill up the form.
How To Fill Up The Drop-down Form
On the Reply type field, you will see the format you have selected from the table under the free keyboard options. Of course, you can change the format from a drop-down list.
Now specific where you want to save the information whether on the custom field or the system field. You can specify the both of them. You can assign the information in a label. In this case, first you have to create a label on the messenger subscriber’s label/tags option for the Facebook page you have selected here.
Select a messenger sequence in the ‘Assign to messenger sequence’ box— this is optional, you can keep it blank. you have to add messenger sequence from sequence messenger settings. Read the blog to know how to add messenger sequence.
Then select an email/phone sequence in the ‘Assign to email/phone sequence’ box. It is also optional— you can keep it blank. Please, read the blog to know how to add email/phone sequence.
If you want to enable a skip button under the question, write down some text in the skip button box. By clicking on the skip button, an user can skip the question.
If you want to remove the question, click on the ‘Remove this Question’ at the bottom of the drop-down form.
After you have added a question and make a setting for the question, you have to select a template for the final reply in the ‘Select Final Reply Template’ box. In this case, you have to create the reply template. By clicking on the ‘Add’ button under the box, you can create the template. If you have a reply template created before, just as you click on the box, a drop-down list of reply templates will appear. This reply template will send the users a final message when your clients have finished answering all the questions.
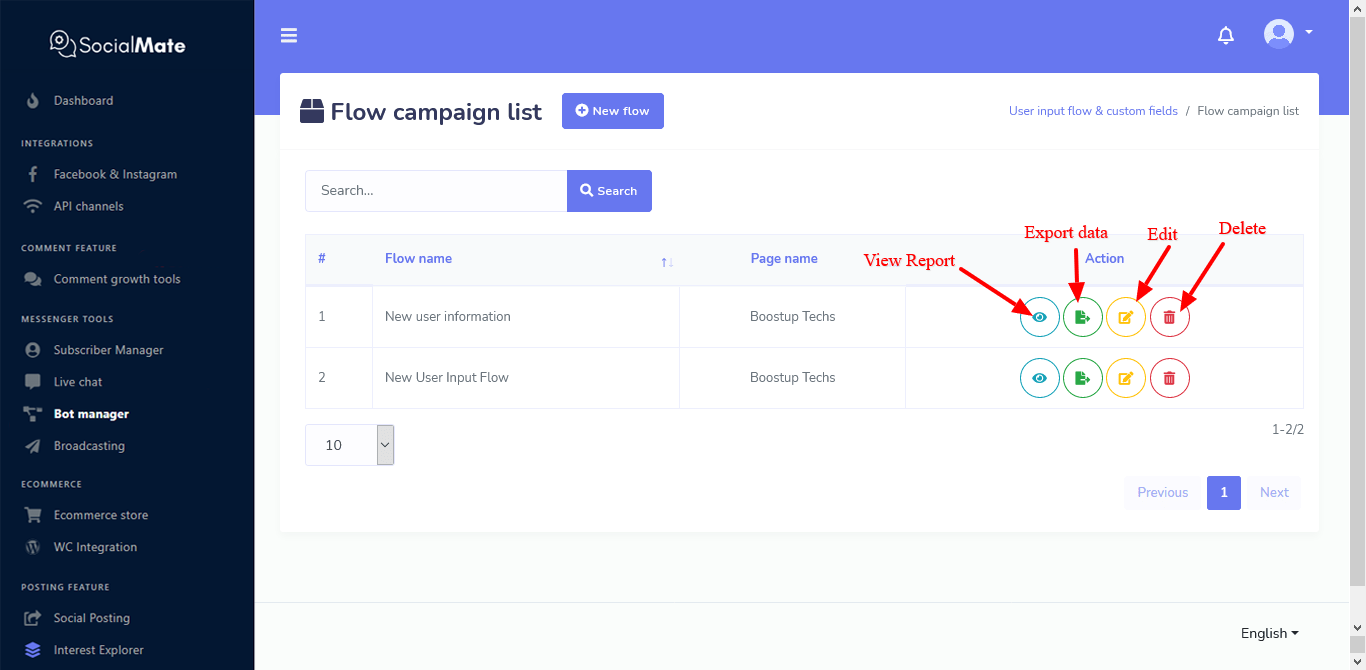
Now click on the submit button to finish creating the campaign for the user input flow. Instantly, the campaign will appear on the page.
Anyway, you can add as many campaigns as you want. And all the campaigns will be listed on the page.
You can edit, delete, export data, and view reports of any User Input Flow Campaign.
Connecting User Input Flow with the Messenger Bot:
Now you have to connect the campaign with the messenger bot to collect data from the users.
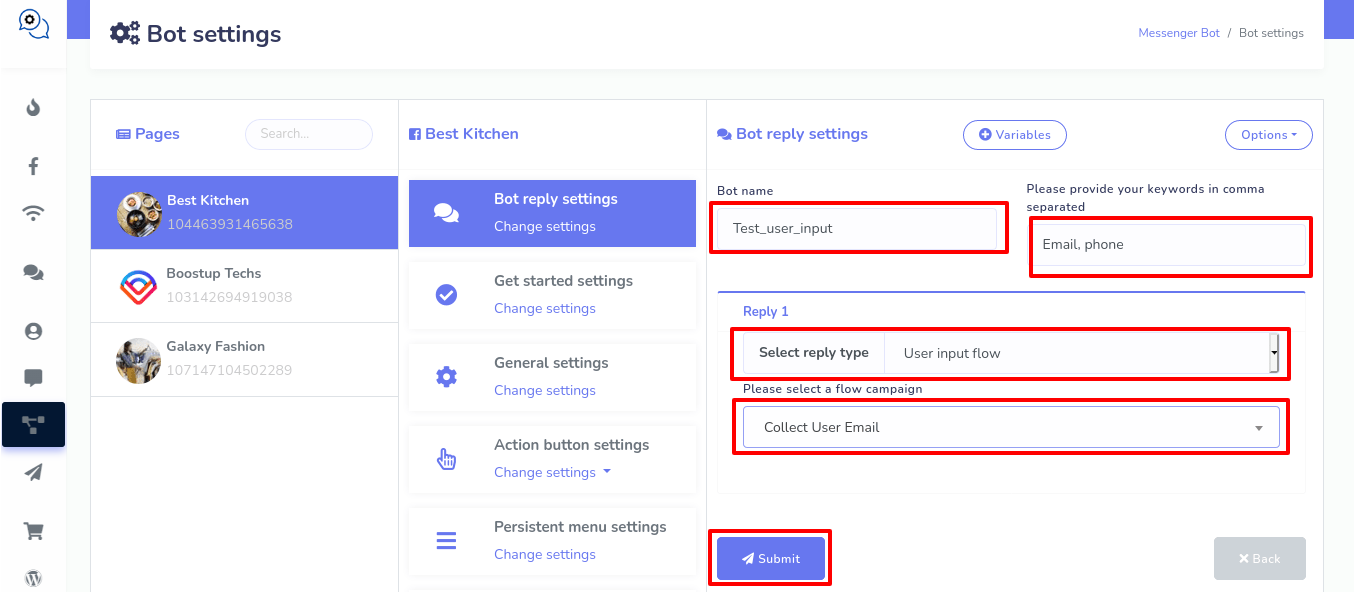
To connect the campaign with messenger bot, go to Messenger Bot> Bot Settings> Action> Bot Reply settings > Add Bot Reply.
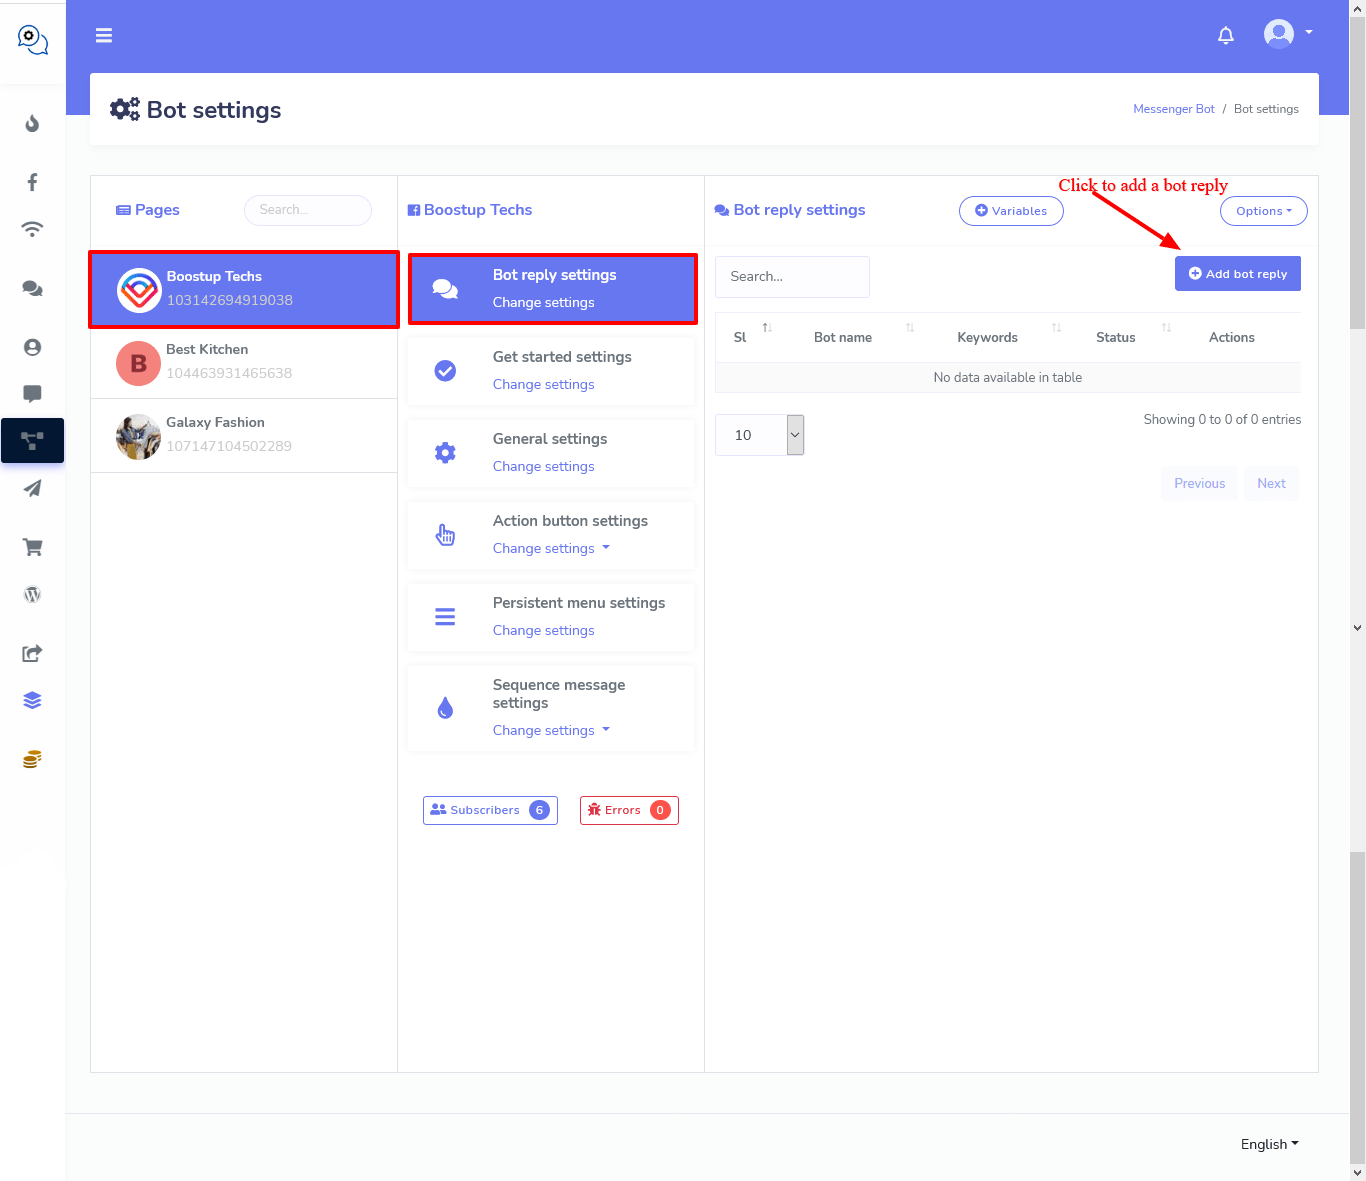
Now click on the Add Bot Reply, instantly a form will appear. Now you have to fill out the form.
How To Fill Out The Form:
In the Bot name box, write a name for the bot. Then write down some keywords comma separated in the keyword box. After that, select a reply type in the select reply type box. Just as you click on the select reply type box, a drop-down list of reply type will appear. From the drop-down list, select User input flow. You can also enable typing on display by enabling the radio button and you can select time delay in reply in seconds.
In the Bot name box, write a name for the bot. Then write down some keywords comma separated in the keyword box. After that, select a reply type in the select reply type box. Just as you click on the select reply type box, a drop-down list of reply type will appear. From the drop-down list, select User input flow.
Now click on the select a flow campaign and the campaigns you have created will appear on a drop-down list. Now select a campaign and click on the Submit button.
Now click on the submit button.
Now If a user writes something in your messenger that matches with any keyword you have provided, the campaign will be started.
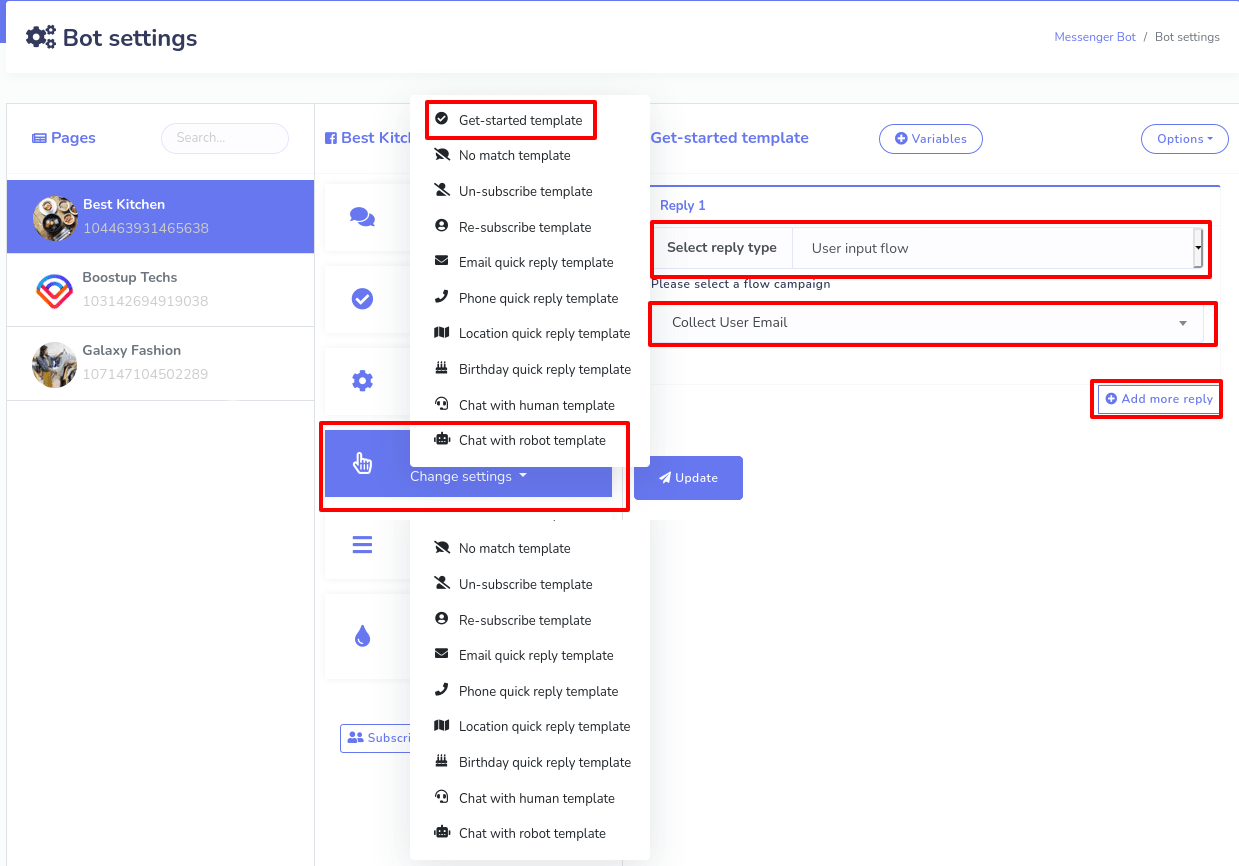
You can also add the User Input Flow campaign to the messenger bot with Get started template.
On the Bot Reply settings page, click on Action Button Settings and a popup menu will appear. Select the get started template from the menu. Instantly, get started template will appear at the right panel of the page. Now you have to fill up the template.
Click on the ‘Select Reply Type’, instantly, a drop up menu will appear. Select User input Flow. Now click on the select a flow campaign and the campaigns you have created will appear on a drop-down list. Now select a campaign and click on the Submit button.
When a user clicks on the Get started button on your page’s messenger, the user input flow campaign will be started.